 |
Some new and really good quality old stock equipment from the days of 35mm film photography can still be found if you know what to search for. The SUNPAK GP-04 is a really useful hand grip come flash bracket, the quality and design of which puts many similar modern day accessories to shame. The Sunpak GP-04 was made in Japan from really good quality moulded plastic and the hand grip itself is sculpted for absolute comfort. The two parts simply snap together and lock to form a very sturdy and functional camera flash bracket ideal for macro and events photography. The camera platform base plate (or the handgrip itself) can be rotated and locked to any one of 10 different angles/positions providing greater flexibility for most photographic situations and scenarios.
 
A view of the locking mechanism

A small hole should be drilled in the hot/cold shoe to accommodate the locking pin of a Speedlight otherwise the Speedlight flash will most definitely slip off at some point.

I slightly modified this particular bracket by shortening the base plate by an inch or so, a small piece of plastic was glued onto the base plate in order to close the end and to prevent a loose camera from accidentally sliding off. This rectangular plastic piece can also be drilled and used as an anchor point to fix a hand strap.

Mounting the Speedlight flash off camera also means that the pop-up flash can be used to trigger the Speedlight and being able to hold the camera unit with the left or the right-hand makes life much easier when swapping accessories or altering the setup. The Sunpak GP-04 camera/flash bracket was not very expensive, I bought mine for £15.00. (now on eBay for £17.50)
In the field, ball heads are an issue when it comes to macro photography, most if not all are incapable of holding a flash unit at the correct set angle for very long, all of the devices I've seen and the few I've used are either inadequate or impracticable, most are too flimsy. The adjustable locking elbow device I'm currently using is made from plastic and was stripped and adapted from the top of a cheap lightweight monopod, although not 100% perfect for the task it'll do until I find or make something better. Potentially there's a huge market for a simple, small, strong, compact well made adjustable device or even a solid rigid device set at an angle suitable for holding a tilted Speedlight for macro photography either on or off camera.
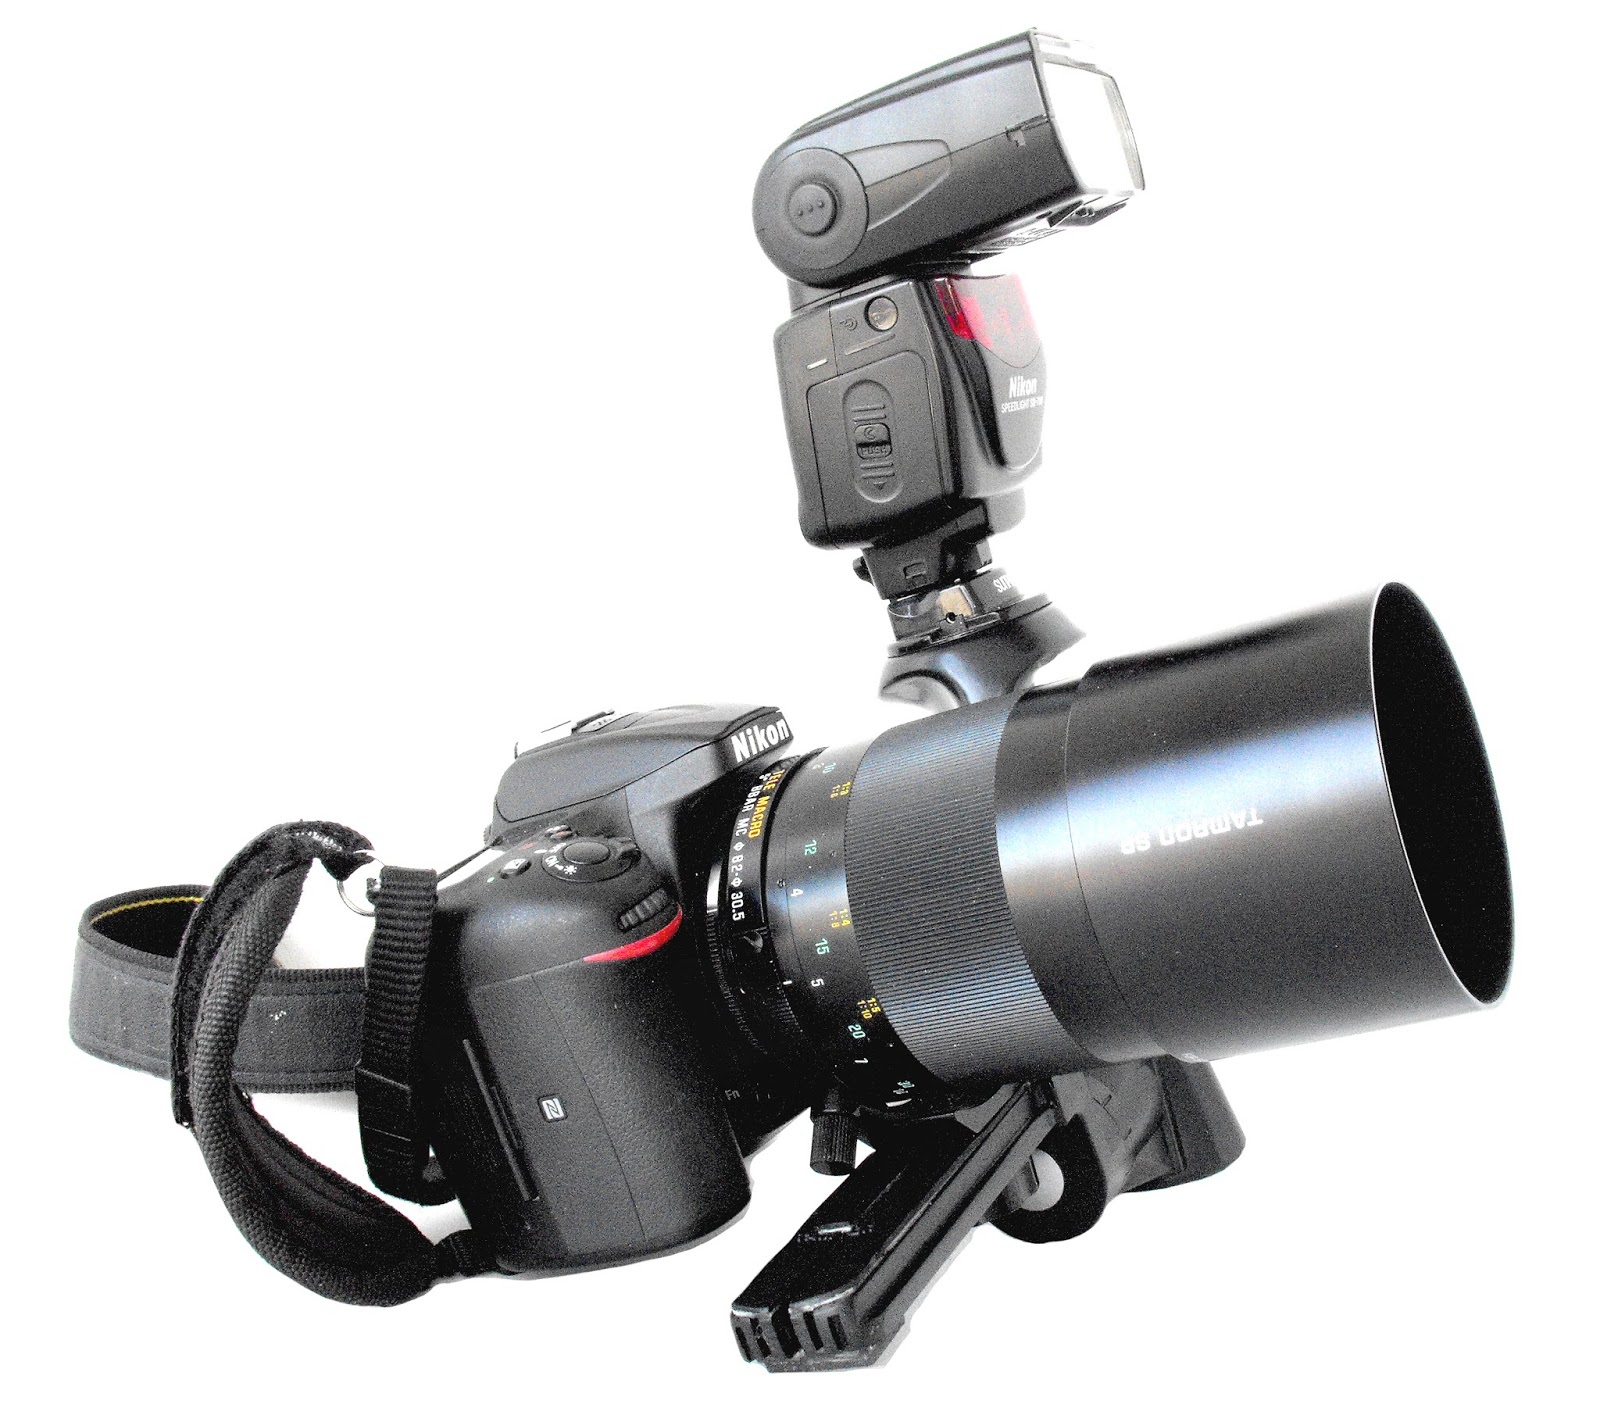
A flash bracket is ideal for longer or heavier lenses that have a tripod mounting collar as the lens can be directly attached to the camera bracket itself ensuring that the weight of a long lens is not putting pressure on the camera's lens mount.
New (old stock) Sunpak GP-04 currently advertised on eBay for £17.50 |
Thursday, September 13, 2018
Flash bracket/Hand grip
Thursday, August 2, 2018
Tamron 500mm f/8 tele macro mirror lens
Tamron SP 500mm f/8 tele macro mirror lens (model 55b)
A lot of photographers just don't like mirror lenses at all but personally, I think that they're a great way to get into long lens photography on a tight budget, even though the results from mirror lenses can be a bit hit and miss. I definitely think that it's because of their lack of consistency and ability to produce acceptable images 100% (or even most) of the time that mirror lenses are much more suited to digital photography than they were ever suited to film photography, ie no wasted time and wasted money on films/processing etc. and no 10 days waiting time for a wallet full of 36 blurry prints. Getting sharp pictures with mirror lenses can at times be extremely difficult due to a number of reasons, camera shake, fixed aperture, extremely shallow depth of field (especially on subjects close to the camera), and very low contrast images due to insufficient light, Oh! and dough-nuts (often by the dozen), but taking into consideration the limitations of mirror lenses and given the right conditions most of the better quality reflex mirror lenses are capable of producing sharp images.
The Tamron 500mm f/8 is described as a Tele-Macro but using this lens for macro work is very difficult as it's depth of field is minuscule and focusing on small insects from 6ft away and getting the image sharp is extremely difficult but for some larger insects like dragonflies reasonable results can be had if the photographer is patient and more selective especially with composition. When using this lens as a macro for insects I've had some success using the following method, I always try to get the subject square on and flat to the plane of the camera's lens/sensor and also bear in mind that the flatter your subject is the sharper your final image will be. So think flat, square on, well lit and bang in the middle of the lens, and don't go for fancy angles and compositions when shooting insects or wildlife if absolute sharpness is your intention as the focus and depth of field fall off considerably when the subject is at an angle to or leading away from the camera/lens. Selecting and focusing square on upon one single isolated subject out on its own is much better than trying to capture a small group of objects or subjects bunched closely together, simply because mirror lenses have such weird bokeh, anything surrounding, in front of, or slightly behind the main subject won't have a gentle out of focus blur about it and it won't be sharp either, unless the main subject or subjects are some considerable distance away from the camera and the distance between the target and near background objects are more compressed. Mirror lenses work well when photographing relatively close or midrange subjects that are set against a plain background (sky or distant landscape) as this lessens the visual confusion in the final image.
 |
| Tamron SP 55B 500mm Mirror Lens |
If the original 'Normal' filter becomes lost then I suppose an ordinary 30.5 clear UV filter might be a suitable alternative replacement. An 82mm thread on the front of the lens accepts the screw-in lens hood which in turn is also threaded to take 82mm filters intended for conventional use. After the lens's mirror was slightly modified in 1983 the tripod lens collar was discontinued and the lens model number was changed to 55BB. The filter set was also supposedly discontinued but I've seen many secondhand models of the 55BB which include a full 30.5 filter set. The owner manuals for both the 55B and the later 55BB are virtually identical (apart from the front covers and a reference to mounting the lens on a tripod), and on page 13 both manuals state that a 30.5 rear filter should always remain in place when taking photographs.
 |
| Page 13 from owners manual model 55B |
Four Spotted Chaser Dragonfly
 |
Dragonfly, Four Spotted Chaser, taken with a Tamron SP 500mm f/8 Tele Macro Mirror lens |
Mirror lenses tend to have lower contrast than regular lenses so bright sunlight, fast shutter speeds, ISO's higher than 500 and a monopod are basic requirements for good sharp images. Apart from the basics, bumping up some of the in-camera settings such as contrast, sharpness (to highest) and clarity also helps a lot with this lens.
Fallow Deer eating reeds
 |
Fallow Deer eating reeds, taken with a Tamron SP 500mm f/8 Tele Macro Mirror lens
Clock tower
 Clock Tower, 500mm Tamron Mirror Lens, Slight sharpening applied and angle/perspective corrected |
 |
Juvenile Blackbird (trying to cool down? in the 2018 UK heatwave) |
Backgrounds produced by mirror lenses aren't always peppered with doughnut rings (the result of out of focus highlights caused
by the obstruction in the centre of the lens) although backgrounds are quite often a bit woozy and confusing due to a fixed aperture and the peculiarities of mirror lenses in general. The image of the bird above was taken at a distance of about 10 -13 feet and with just about enough DOF to separate the main subject from the background.
Thankfully due to their natural characteristics, quirks and peculiarities mirror lenses can be used creatively and some cool and unique dream-like effects can be achieved but nothing is easy and in the case of effects, subject selection and composition is critical.

Tamron SP 500mm F/8 Mirror lens (Model 55B)
Specifications
Focal length................. 500mm
Aperture...................... F/8 (fixed)
Construction................7 elements in 4 groups
Angle of View.............. 5'
Coating........................ BBar multilayer coating
Min. Focus.................. 1.7 metres (66.9")
Max. Magnification.... 1 : 3 (2 x Tc 1 : 1.5)
Length......................... 87mm
Diameter..................... 84mm
Weight ........................ 576 g (20.2 ounces)
Lens Hood .................. Detachable, screw in (82mm thread)
Filter rear.................... 30.5mm 'Normal filter' supplied/fitted
Filter front................... 82mm thread
Optional Accessories .. Rear filter set Nd4X, Y52, O56, R60
Flat field 2x tele available.
(BBar = Broad Band Anti Reflection)
Monday, July 30, 2018
Zenza Bronica EII 75mm f/2.8 lens

75mm Bronica f/2.8 lens with Fotodiox adapter for Nikon

The 75mm Zenza Bronica EII (Etrs) lens is a really good quality lens, It's rock solid and extremely well made, you can just feel how good the lens is the instant you turn the focusing ring. In their day Bronica medium format cameras and Zenzanon lenses were used by many pro-photographers, the lenses were reasonably affordable and not as expensive as some other medium format equipment or the high end 35mm camera's and lenses of the day, but they still cost a chunk of cash, in the late 1980's to early 1990's this particular 75mm Bronica lens sold for about $360 and (according to one online inflation calculator website) this sum now equates to about $713 in (2019) today's money, although I doubt that you could buy a new lens today made anywhere near to the same standard and quality of any Bronica lens without paying well over that amount. The Zenzanon 75mm lens was the standard prime focal length lens for the Bronica Etrs camera in much the same way as the 50mm lens was the standard prime for 35mm film cameras.
The increased availability and use of adapters now means that those old medium format lenses baring names such as Zenza Bronica and Mamiya are once again becoming sought after. I first started to look at Bronica gear about four years ago, Ffordes Photographic (Inverness, Scotland) then had 3 to 4 pages of Bronica Etr lenses listed on their website but a recent look at their web-site's Etrs page listed only 1 single Bronica Etr/s lens which gives some idea of how popular these old lenses are becoming. Luckily many medium format lenses are still relatively easy to find and readily available across the internet but they are starting to dry up (noticeably) and as of 2018 a good to an excellent example of this lens might cost somewhere in the region of between £80 and £150. I have seen examples from private sellers in the USA priced as little as $50 but the cost of shipping to Europe and the UK hikes up the price considerably.
Although medium format equipment is portable It's primary purpose would have been for studio work, you wouldn't want to be carting around a bag full of Bronica lenses that's for sure, the 75mm lens itself is quite heavy and weighs in at 450 grams about 1.00lb, the 50mm PE lens is slightly heavier at 490 grams. A Bronica lens certainly gives a professional look and feel to a Dslr, a kind of cool looking retro modern mix, a bit on the heavy side for some, but Bronica lenses produce really nice photographs so I think that's it's worth the extra hassle.
The 75mm EII stops down from f/2.8 to f22 in full stops and it has 6 elements in 4 groups, the lens has an angle of view equal to a 45mm lens when fitted to a full frame 35mm camera. Bronica lenses can only be used in manual modes on digital cameras although Bronica lenses do have a built-in electronically controlled 5 bladed Seiko diaphragm leaf shutter which is useless on a Dslr as lens adapters don't have any of the necessary electronic contacts and connections. The built-in aperture/leaf shutter is operated manually by simply pressing the stop down depth of field preview button, It's a simple procedure, first set the aperture to say f/8 (or whatever) and focus, then press the stop-down lever on the lens barrel and hold it down whilst taking the photo.
Nikon have focus confirmation built into their cameras but some other camera makes such as Canon require the lens adapter itself to have a dandelion chip to enable in-camera focus confirmation. (Note) A cheaper adapter for Canon without a dandelion chip is also available but focusing the lens without a focus confirmation indicator as a reference point is so much more difficult.

The stop-down depth of field preview lever (or button) can be seen here at the fore end of the lens barrel, the small tab with the blood red dot is the adapter's lens lock/release lever
and due to its very small size it's difficult and very uncomfortable to depress and hold down whilst trying to separate a tight lens from the adapter. Some Bronica lenses are definitely very tight but others go on and off the adapter as smooth as silk.
Using a Bronica lens on a Dslr is simple enough, providing that the user remembers to press the stop-down lever before taking a photo (quite easily forgotten if Bronica lenses are
only used occasionally).
Detail

Full image, infinity at F/8

The same image cropped at 100%, off centre background detail still appears sharp
Overall the Zenzanon 75mm f:2.8 lens performs very well but on rare occasions even with care there can be just a hint of veiling, though nothing too serious that it can't be easily dealt with, older lenses obviously don't have modern coatings so some consideration must be applied when using them without a lens hood, the front element of this lens is recessed very deeply into the barrel of the lens so it really shouldn't suffer any flare at all unless pointed directly into the light. PF is not an issue with this lens and at the correct aperture and exposure this particular lens is easily capable of producing clean sharp images and capturing detail in the distant landscape.

Middle ground objects at infinity have only a slight softness. (image cropped at 96%).

The Zenza Bronica 75mm lens captures colour and detail really well and so long as your exposures are not at the extreme ends of the photographically acceptable scale of common sense then most images will only require the normal or minimal amount of post-processing. Settings can also be tailored to suit particular lenses in-camera which should further reduce the need for time-consuming post-processing, but go easy, as adding sharpening to an already sharp lens will make for a much harder looking image.

Colour
The Zenza Bronica 75mm lens captures colour and detail really well and so long as your exposures are not at the extreme ends of the photographically acceptable scale of common sense then most images will only require the normal or minimal amount of post-processing. Settings can also be tailored to suit particular lenses in-camera which should further reduce the need for time-consuming post-processing, but go easy, as adding sharpening to an already sharp lens will make for a much harder looking image.
Chromatic aberration or PF (purple fringing) isn't an issue with this particular lens, the edges around high contrasting colours remain sharp and true, they aren't blurred or bordered by purple fringing or any other colour anomalies.

75mm Bronica f/2.8 lens with Fotodiox adapter attached.
Lens stats
Focal length ........75mm
Model .................. EII
Filter size ............ 62mm
Elements ............ 6 in 4 groups (Early E Mc's, 5 elements in 4 groups)
Aperture .............. f/2.8 - f/22
Min Foc. dist. ...... 0.60 (2ft)
Weight. ................ 450g
Produced ..............1981 - 89
Diaphragm........... Fully automatic Seiko central leaf shutter.
Manufactured...... Japan (Tamron)
Nikon Series E 100mm f/2.8 lens
Nikon Series E 100mm f/2.8 lens, quick fix.
I was already familiar with the image quality and reputation of the Nikon Series E range of lenses long before I bought a Nikon 100mm f/2.8 Series E a couple of years ago, it's cosmetic condition was about average for its age, image quality and contrast was quite good even before cleaning, but now, wide open at f/2.8 it's significantly sharper than my 75mm Bronica f/2.8 is at the same wide open aperture, (I use both lenses with a Nikon D7200 camera). Sharpness between the two lenses evens out at smaller apertures and by f/8 both lenses are about the same.

Nikon 100mm 2.8 Series E
Anyway shortly after purchasing the Nikon 100mm E series lens I noticed that it had started to develop an annoying noise and a noticeable vibration as the focusing mechanism moved across the dry helicoid threads.
At first, it's whinging was not particularly irritating but the noise became more annoying after I remembered someone once described their own Nikon 100E as sounding like a mule. Dirt and dryness is a problem with many old lenses and the Nikon E series from the late 1970's and early 1980's probably suffer not only because of their age but also because some cheap inferior cost-cutting materials were used in constructing the E (for Economy) range of lenses.
Even at f/2.8 contrast, colour and bokeh are quite strong.
I decided to try and cure the protests of this particular lens (hopefully) forever so I searched for some advice online, at first it looked as if I'd have to completely disassemble the lens. I started to explore and the first screw I took out immediately disappeared down the side of an armchair never to be seen again, but luckily I had some more screws of about the same size (which I didn't lose before) from an old obscure manual lens I'd specifically bought for spares and experimentation from a car boot sale some time ago.
After removing the rear element I discovered that I could just access the last threads of the helicoid so I thought that I'd try and cure it's problems the easy way first, before attempting to completely dismantle the lens.
I cleaned the rear element and put it to one side and then I carefully reached inside the lens with a swab on a thin stick and cleaned the rear of the front element group which was now easily accessible straight through from the back of the lens, then I lubricated the (just visible) last threads of the helicoid.

Sharpness in the centre is very good at f/2.8
I used spray grease for the helicoid threads, (firstly) I sprayed some grease into a container and left it until the propellant/vapor (or suspension medium) had evaporated, the grease now much thicker was applied to the helicoid thread using a suitable implement (a thin stick).
Once reassembled I worked the focusing back and forth for 10 minutes or so attempting to spread the grease evenly throughout the length of focusing travel.
The vibrating bray disappeared, it was now smooth without play and with just enough resistance to give a satisfying new lens like feel to it.
A few days later the weather was very bright (and very cold) so I decided to take the Nikon 100E out for a few turns, I took all shots wide open at f/2.8. Away from direct sunlight most of the test shots were quite impressive at 2.8, clean and sharp though after intentional testing into the light some images did suffer veiling flare so due care should be taken in very bright sunlight, without a lens hood this particular lens will suffer from veiling flare.

Veiling flare Shaded with hand

The Nikon 100mm E series lens is small, very lightweight and really sharp, my particular lens has strong contrast and quite hard bokeh, a 52mm thread allows for filters or lens hood. This lens is much smoother and sharper after cleaning and lubing, now I wouldn't sell it for double the price I paid for it.
The 100mm Series E can still easily be picked up in good to excellent condition for somewhere between £60 and £100.

Nikon 100mm 2.8 Series E
Subscribe to:
Posts (Atom)
-
 75mm Bronica f/2.8 lens with Fotodiox adapter for Nikon I've been using a 75mm f/2.8 Bronica Zenzanon EII lens on my...
 -
 Tamron SP 500mm f/8 tele macro mirror lens (model 55b) A lot of photographers just don't like mirror lenses at all but personally,...
 -
 Nikon Series E 100mm f/2.8 lens, quick fix. I was already familiar with the image quality and reputation of the Nikon Series E range o...